With the price of gasoline and insurance skyrocketing today, you might want to consider doing a do-it-yourself LPG project like this one. Often, when a person picks a car, they don't often consider the operating costs (fuel, insurance, maintenance, depreciation, etc.). As an example of a vehicle cheap to own and maintain, let's look at a used General Motors full-size (B-body) car, which are durable and cheap in the used car market. Besides, replacement parts are readily available and are dirt cheap. These cars are also easy to repair by any backyard mechanic. With it being large, utilitarian, and not new, these cars are about as cheap to insure as you can get. An added benefit is that, at least in Ontario, cars older than 1987 are not required to be emission tested. Other manufacturers' full-size cars would be similar. Of course, you will still need to visit a mechanic who can certify that your DIY conversion meets provincial or state safety standards. This certification will allow you to fill your vehicle with fuel. Do NOT drive the car until has been certified to be properly converted.
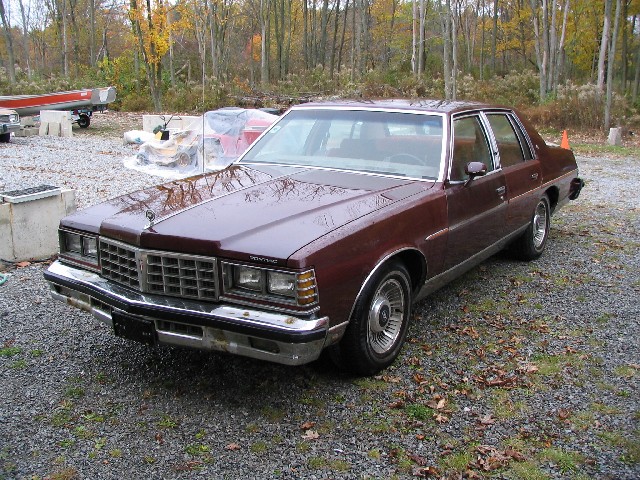
Now these cars don't seem to be very fuel-efficient running on gasoline but are actually similar to modern minivans, especially if equipped with overdrive transmissions. They carry a family of four comfortably and have enough trunk room to carry plenty of stuff. Obviously, minivans can carry a more due to their blobbier design but we are looking to save money on fuel. If you have to do any towing, full-size rear-wheel drive cars are a better choice than most minivans. For this example, let's look at how we can convert a 1977 Pontiac Parisienne (GM B-Body, Bonneville in the USA) to straight propane. The car in this project was already converted to propane many years ago but is a good example of what components are required and how they are installed. Luckily, General Motors provided this car with a Chevrolet 350 engine, which makes replacement engine parts even cheaper and more readily available. Dual fuel is another option but, since for this example we live in an urban area with readily available refueling stations, we will replace the gasoline tank to maintain our trunk space and optimize our conversion for maximum fuel efficiency and power.
You will need the following major components for this conversion:
- tank
- filler valve
- fuel lock-off device
- propane converter (vaporizer/regulator)
- propane carburetor
- fuel lines
The cheapest way to get these components is to scour the junkyards for a complete vehicle but older vehicles are becoming hard to find in junkyards. Since junkyards don't often get calls for these parts, you can get everything you need for $100 to $200. Often the junkyard will only charge for the major items so be sure to get as much as possible on your parts expedition. You could consider all the other small incidental parts you get to be free so don't be shy. If the donor car was from a northern area, the fuel line fittings may be corroded, which will mean you will need to buy new ones. ASME motor fuel tanks don't expire but will need to pass a visual inspection. It is a good idea to have it recertified (new valves, hydrotesting, fresh paint), which should still be cheaper than buying a new tank.
You will need to check with a local conversion shop to ensure that your planned conversion will meet your alternative fuel conversion authority's requirements. Newer vehicles may require a electronically controlled feedback system to pass local emission regulations.
If you can't find a suitable donor car, the other option you have is to buy new parts:
| Description | Manufacturer |
Part # |
| Fuel Tank - 99 litres LPG (26 USG) | Sleegers | 10x10x10x36 SEUW |
| Filler Valve | Sherwood | PV1855SD (3/4" NPT outlet) PV1855BRCN (1/2" SAE Flare outlet) |
| Spit Valve (indicates 80% full - if fuel tank is not equipped with an auto-stop fill valve) | Sherwood | PV10D |
| Under License Plate Filler Valve Bracket | dealer item | |
| Remote Fuel Fill Line to tank | dealer item | CGA Type III hose with 1/2" SAE female swivel ends |
| Remote Spit Valve Fuel Line | dealer item | CGA Type III hose with 1/4" SAE female swivel ends |
| Fuel Line from Tank to Fuelock | dealer item | CGA Type III hose with 1/4" SAE female swivel ends |
| Hydrostatic Relief Valve | Sherwood | PV3865 |
| Fuel Lock-Off Device | Impco | VFF30-2 |
| Converter | Impco | EB-2 |
| Propane Mixer | Impco | CA425M-2 |
| Quadrajet Throttle Body to Mixer Adapter | Gann | AT9-8 |
| Quadrajet to Impco CA-425 Throttle Body Assembly | Gann | AT9-13 |
| Air Cleaner Spacer Ring (5-1/2" OD x 5/8" high) | Impco | A1-62 |
| Converter Mounting Bracket | Gann | GB87 |
| Fuel Pump Block Off Plate | Gann | 622 or 622N |
| Fuel line from Lock-Off to Evaporator | dealer item | CGA Type III hose with 1/4" SAE female swivel ends |
| Water Hose "H" adapter (5/8" x 3/4") | Gann | H4-5 |
| Water Hose "Y" adapter, nylon (combination 5/8" x 3/4") | Gann | 6655-YN |
| GM distributor governor weight springs | Gann | 2056 |
| GM HEI distributor advance limit plate | Gann | HEI |
| GM HEI Distributor mechanical recurve kit | Moroso | 72300 |
| GM HEI adjustable vacuum advance | Proform | 66952C |
The underhood propane conversion kit for this type of conversion consists of 2 parts packages: Model 425 Quadrajet Carburetor Kit and the Model E & Vacuum Lockoff Kit.
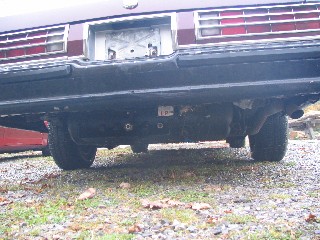
You will have to fabricate some brackets to mount the tank to the vehicle if the donor car is different from your project car. You will also need to remove the gas tank if you are placing the propane tank in its position. The tank should be securely mounted to the car so that it cannot come loose in the event of a collision. The tank must be secured to the frame with high strength bolts. The mounted fuel tank must have adequate ground clearance or you will end up scraping it or (worse) bumping it on the ground. To determine whether your tank will have adequate clearance, draw an imaginary line between the place where the rear tire meets the ground and the bottom of the lowest part of the back of the car (usually the rear bumper). If all parts of the new fuel tank fit above this line, your tank installation will be OK. If not, you will either have to look for a different tank or move the bottom of the the lowest part of the back of the car even lower. This lowering could be done with a new class III trailer hitch but you will need to check with your certifying mechanic.
Since the tank is the most expensive part of the installation, it would not hurt to protect your investment with rust-preventive coating. Do this after you have done the trial fitting and just before you are about to make the final installation. Brand new tanks will usually have a fresh coat of white paint from the factory but you can still improve upon the finish with an additional coating of rust-inhibitor paint or rubberized stone-guard. The white color is to reduce the adsorption of solar heat and is not necessary for a trunk-mounted tank. An underbody tank can potentially absorb radiated heat from the pavement though.

Bolt the brackets onto the tank and again fit the tank to the car. Mark the frame rails with the location of the new brackets' bolt holes. Remove the tank and drill the holes. Finally, put the tank back in position and install high strength bolts long enough to pass through the brackets and the frame rail with enough thread showing to install a washer and a nut. The new brackets will probably not meet the frame rails so you will have to use washers to take up the clearance between the bracket and the frame rail. Use the same number of washers on each side of the tank if possible.
The propane fuel tank is a bit heavier than the gasoline fuel tank. You may also want to consider replacing the stock rear springs with variable rate spring. I prefer Moog Cargo coils which can be 1" taller than a generic variable rate spring and will ride nearly an inch higher too. Remember, the automatic shutoff valve depends upon the tank to be correctly oriented so you end up with an under-filled or over-filled tank if the car doesn't sit properly.
If you decide to go with a trunk-mounted tank, the fittings (appurtenances) must be enclosed in a vapor box. Trunk-mounted tanks normally are equipped with an vapor box to contain any leakage and direct it outside of the car. It is possible to retrofit a tank with such an enclosure but this may require a recertification, which could add considerably to the cost. I did do such a thing to a trunk-mounted tank and this turned out quite well. Sleegers Engineering did this work and this tank will be used in Project 2 (look for this later).
For a straight propane conversion, intake manifold heat is not required and your engine will run best if you make the intake manifold as cool as possible. It is not necessary to switch to a 160°F thermostat though. However, if your vehicle was originally equipped with an EGR system, you must ensure that it remains in place and fully functional so you could block off one side of the cross-over passage to reduce heating flow. EGR improves cruising fuel economy in addition to reducing NOx emissions so don't think about disabling it. For mono-fuel engines, you may also completely remove your heat riser valve (for V8 engines) or force it to the hot position (for inline engines). Removing V8 engine heat riser valves will marginally improve exhaust flow but will also remove the potential for future heat riser valve failure.
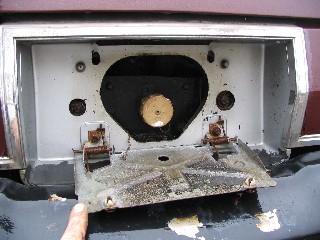
Tank Filler Nozzle. With your tank in place, you need to mount the other hardware in place. The tank filler nozzle can be mounted in a number of positions but on this type of vehicle, the location of the gas tank filler behind the license plate is probably the best. Since the tank in this case is equipped with an auto-stop fill valve, no remote spit valve is required beside the fill valve. |
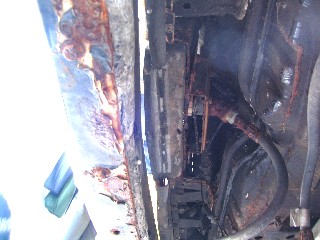
Tank filler nozzle looking up from below. The long thing running from the top to the bottom of this picture is the rear bumper. You can see that there is a mounting plate bolted onto an offset bracket. As this car was used throughout Canadian winters, there is a bit of corrosion on the connections due to road salt. Annual rust preventative undercoating is a good idea for areas with winter roadsalting. The remote fill valve screws into a remote fill valve mounting plate that has a 45° elbow welded onto it. A brass adapter screws into the elbow to convert from a 3/4" FNPT thread to a 1/2" male SAE flare thread. |

Fill connection on the tank. While I had the springs out to replace the brakes lines on the axle, I was able to get a good shot of the this fitting from the driver side rear wheel opening. The tank's fill connection is equipped with a check valve as is the remote fill valve. Two check valves does slow filling down a bit because of the additional flow resistance. The hose connects to the nozzle in the above photo and is 5 feet long. To ensure that the tank is well grounded, I reused the gasoline tank's ground wire and fastened it to the protective tab under the fill connection. |
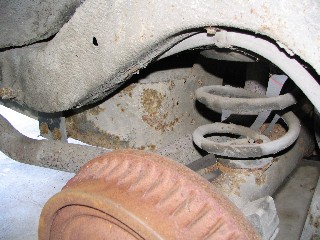
Tank Heat Shield.TSSA in Ontario requires that a heat shield is placed between the tank and the tailpipe when the clearance between the two becomes tight. Notice that the hose is fastened to the underside of the frame's wheel arch. The mechanic who installed this hose left me open to the risk of having the hose pinched by the axle bumper. I'll have to relocate it the next time I get the springs out. Luckily the springs are stiff enough that I have never bottomed out the car. |

Fuel LockOff. The fuel lockoff device receives LPG from the tank. A fuel shut off valve inside this device opens the valve with manifold vacuum from the engine. A felt-type filter within this device removes any contaminants that may be carried with the fuel. Vacuum from the mixer actuates this device. Use the vacuum tap from the mixer rather than manifold vacuum. |

Impco 425 Mixer. This mixer bolts onto a Rochester Quadrajet throttle body to become a propane carburetor. When the Chev 350 engine first starts, it runs a bit rough so the AC throttle kicker solenoid is used to provide a fast idle. On this car, the defroster switch inside the car automatically starts the air conditioner to ensure that dry air is used to clear the windshield. Turning the defroster on when first starting the car provides the engine with a fast idle to help the warmup. Usually, by the time I have the windows scraped and the snow cleared off the car, the fast idle is no longer required for the engine to idle smoothly. |
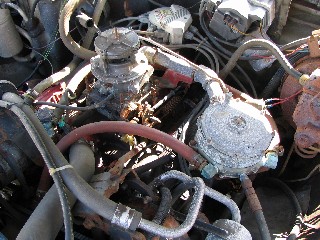
Mixer & Converter. Impco Model 425 mixer and Model E converter. I installed a balance line to connect the mixer to the converter to ensure that any restriction in the air cleaner assembly won't affect the fuel mixture. |
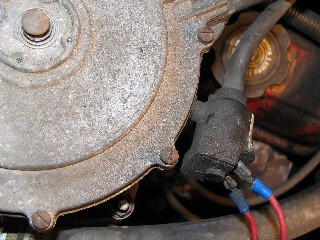
Start Assist Valve. To ease cold starting, an enrichment valve was added to the converter. This is the black device barely visible on the back side of the converter with two red wires coming out of it. |
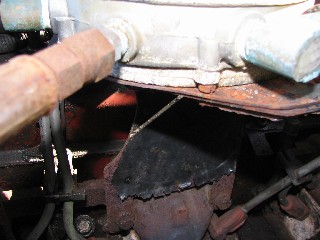
Converter Bracket. Because the converter was moved so far away from the mixer to allow for the use of the OEM air cleaner, a custom-fabricated bracket was used to support the converter. The bracket was attached with the exhaust manifold bolts. Because the converter is installed horizontally, there is no way for heavy ends to drain from the converter and these deposits will have to be periodically cleaned out. Heavy ends are the liquids that are always present in propane fuel and appear when large amounts of fuel are evaporated. Some people feel that converter temperature has an effect on the appearance of these heavy ends. |

Converter Hoses - Converter supplied by blend. As an experiment, I tried to supply the converter with as cool a water supply as possible. For the summer AC operation, this car has a vacuum-operated hot water shut-off valve to eliminate any heat from reaching the heater core. This presents a problem for the propane system because piping the converter water supply inline with the heater return hose will not allow any water flow in the summer. With the propane system, an EGR system is not required so the EGR-TVS (Exhaust Gas Recirculation - Thermal Vacuum Switch) was eliminated and that port was used as a hot water supply. A globe valve was installed and cracked open slightly in the summer to always ensure water flow to the converter. |

Converter Hoses - Converter supplied only by hot engine water. I found that my fuel consumption was higher (lower fuel economy) than expected with the above arrangement. I suspect that the fuel mixture was richer than required because the fuel temperature was too low. I rearranged the heater hoses so that the converter always receives hot water from the engine from the valve mounted on the old EGR port. The water exiting the converter returns to the water pump through the 3/4" heater return hose and is connected with a wye. I will have do some driving to know if this hose arrangement works as well I think it should. |

Converter Water Supply. This is a brass globe valve that is mounted on the old EGR-TVS port. In GM's infinite wisdom, the TVS does not use NPT threads so I had to weld a NPT coupling onto the remnants of the old switch to make an EGR-NPT adapter. You can see the EFE-TVS (Early Fuel Evaporation - Thermal Vacuum Switch) to the right of the converter water supply valve. It is the green and black vacuum switch mounted on the thermostat housing. The EFE is also known as the heat riser. |
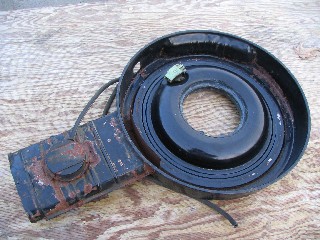
Air Cleaner. As propane engines have more power when supplied with air as much cold air as possible, the original air cleaner and intake snorkel was reused. The 425 mixer has a 5-1/8" air cleaner base so the OEM air cleaner fits properly. However, the air cleaner is a low profile design so the air cleaner lid hits the top of the mixer. A spacer was installed to raise the height of the air cleaner. To minimize the effect of carburetor icing, I reused the EFE-TVS to control the Thermostatic Air Cleaner (TAC). Until the engine reaches operating temperature, the heat stove on the exhaust manifold supplies warm air to the air cleaner. When the engine attains reaches 180°F, the valve shuts off the vacuum and only cold air from the front of the car reaches the engine. The small green thing on the raised part of the base is the TAC sensor, which controls the air temperature reaching the engine. |
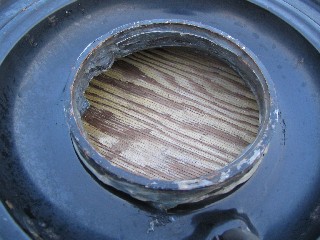
Air Cleaner Spacer. Since there was no way to keep the spacer centered on the mixer, I had to attach the spacer to the air cleaner base. Using a bit of sheet metal, I made a ring that kept the spacer centered under the air cleaner base. Some silicone sealer glues the whole thing together. Raising up the air cleaner caused the tube connecting the PCV filter on the air cleaner to the valve cover to be too short. I had to cut the metal tube and extend it with some hose. |
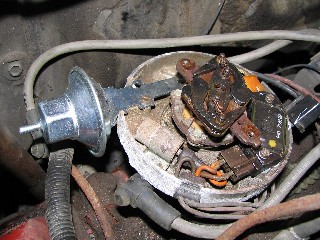
HEI Distributor. Besides having the need to recurve the ignition system for propane, there was some wear on the components of the HEI distributor. No wonder my gas mileage wasn't all the great previously -- I had no vacuum advance because the diaphragm had a leak. Close examination of the original advance weights revealed that the brass bushings were shot. I have not been able to find replacement bushings, which is another reason that I had to switch to the aftermarket kit. The kit's nylon bushings do not fit the original weights. I replaced the centrifugal timing weights with a Moroso HEI Advance Curve Kit (PN 72300) and the vacuum advance pod with a Proform PN 66952C adjustable vacuum advance. Since I used the kit's lightest springs, I did not need to use a limit plate to ensure I had the correct advance. |

Engine without air cleaner. |

Engine with air cleaner. Most people would be hard pressed to know that this is a propane engine when the hood is raised. |
If you find this project interesting and you would be interested in doing something similar, please visit the Raso Enterprises Alternative Energy Systems Forum. You can find other like-minded people there who can answer your questions and give you good advice.
